Manage Template
- 19 Nov 2024
- 24 Minutes to read
- Print
- PDF
Manage Template
- Updated on 19 Nov 2024
- 24 Minutes to read
- Print
- PDF
Article summary
Did you find this summary helpful?
Thank you for your feedback
Introduction
Template is the starting point of the framework. It is one of the most flexible features in the platform. You can design your questionnaire using this page. It can vary from type of question (text, number, choice, drop down, custom table structure with text or choice, any custom field), number of questions per page, information text with formatting, logical condition on field to be visible based on answer selected of another question.
Menu
Surveys --> Manage Templates
Template List

Search : Write the name of the template and click on search button to search the template you have already added and want to modify.
Add Button : Click on add button to create a new template.
Edit Button : Click on edit button to edit an existing template to modify questions, scores and other parts of the surveys/questionnaire.
Participation figures : Shows the number of participants eligible for a particular survey and the progress of the participants like how many users have completed 1%, 10%, 25% etc… of the survey and how many have already submitted the survey.
Copy Button : Helps you creating an exact clone of an existing template. Creating a clone/copy of a template can also help you take a backup of the template before you make any changes to the live template.
Delete Button : Helps you delete the template from the framework. This button is only visible if a template is not in use by a survey.
Template Bulk Menu

It is a feature from where user can update properties of multiple nodes/questions. Follow the steps below to use bulk operation on nodes in template page.
Click on Show Bulk Update Options/Hide Bulk Update Options to show and hide the options for bulk operation.
Click on Select all Children nodes to select all the child nodes on single click of a particular node.
Click on Select single node to select only particular node in the template.
Now tick the tickboxes/checkboxes on the left of every node, so that those nodes will be get selected.
After selecting the nodes click on the options. Mandatory option will make all questions/nodes mandatory, so user has to response/answer the questions those are mandatory, otherwise the page whoe’s questions are mandatory will not get completed.
Voluntary option will allow user to save the page without answering/responding to the questions in the survey.
Visible to Everyone Makes question visible to users and also managers.
Admin only makes question visible and editable to managers only.
Don’t copy responses Will not copy responses from lasy year survey.
Copy Responses Copy all responses from last year survey when page first loads without any save.
Don't include in download does not include in import responses csv.
Include in download include in import responses csv.
Don't notify
Notify
How to include all questions in the download from the template?
In template, you can see the down arrow by clicking on the 'Extended' tab. Once you select all nodes and click on the "Include in Download" button, it means you have included all responses in the import response CSV. You can then follow the steps outlined in the Import Response Help document.
Things need to be considered while importing responses:
- The date format must be in yyyy-MM-dd HH.
- User should be assigned to the survey.
- Region should be assigned to the user.
- The import response would not accept blank values.
Template Toolbox

Cut : Used to cut the highlighted node or group of nodes in case of nested nodes.
Copy : Used to copy the highlighted node or group of nodes in case of nested nodes.
Paste : Used to paste the copied or cut nodes before (as a sibling) or under (as a child) the highlighted node.
Delete : Used to delete the highlighted node or group of nodes in case of nested nodes. Note: All the children of the highlighted node will be deleted.
Add a question : Will create a new question before (as a sibling) or under (as a child) the highlighted node. The node that is added will have a fields for “Question Number”, “Question Text”, “Question Type”, “Scores” and other settings to make question “Admin Only”, “Voluntary/Mandatory” & “Allowed to Copy”.
Add a text : Will create a Inline Text node before (as a sibling) or under (as a child) the highlighted node. For this node you will display a dropdown box which will help you to select whether you want to show the text within the question, show it as a popup, show it as Notes in the right hand module etc.
Add a condition : Will create a condition node under the highlighted node. This node is used to add logical condition to add the visibility dependencies for a question.
Add info : Will create a info node which can store information like Dropdown options, Currency values or conversions etc..
Clear the clipboard : Will clear the clipboard of the copied or cut nodes if you have selected them by mistake or you have changed your mind after selecting them.
This unique number is the node_id of the node. Each node is uniquely identified by this node_id.
Up arrow can be used to provide a direct link to another user to direct reach the highlighted node, which in turn can also be used as a copy source while copying the node from current template to another.
Down arrow can be used to paste the copied node(s) from another template to current template using the URL copied using the Up arrow.
Note
When you want to copy/cut multiple nodes at the same time, you can click on the copy/cut button (see below) multiple times to copy/cut paste as many nodes as you want.
Logic Condition in template
Logic statements in the online tool is used to trigger relevant parts of the reporting framework based on a previous indicator response.
Do not introduce additional spacing between lines - this may cause issues.
Basic functions available
AND
NOT
OR
RESPONSE ("internal name", "node ID") - returns the response as text
VALUE (RESPONSE) - returns the response as a numerical value
1. Example of a simple logic condition checking if a datapoint is not blank
RESPONSE("Q 2 Type of program Both","004c43af9cd240b6a0db049447ce9b72")<>""
- First bit (“Q 2 Type of program Both”) is purely for internal purposes and is used to identify the datapoint. This bit is ignored by the system
- Second bit (“004c43af9cd240b6a0db049447ce9b72”) is the node id of the template being checked in the logic condition and this is used by the system to make the logic statement work correctly. Here it is saying that if the given node id response is not blank(ticked) then the following question(under this condition) should be visible to the user.
2. Example of a logic condition checking multiple datapoints with a OR condition
(RESPONSE("Q 2 Type of program Global","004c43af9cd240b6a0db049447ce9b72")="Global") OR
(RESPONSE("Q 2 Type of program both","004c43af9cd240b6a0db049447ce9b72")="Both")
3. Example of a logic condition checking multiple datapoints with a AND condition
(RESPONSE("Q 2 Type of program Local","004c43af9cd240b6a0db049447ce9b72")="Local") AND
(RESPONSE("Q 2 Type of program both","004c43af9cd240b6a0db049447ce9b72")="Both")
4. Example of a logic condition with NOT, AND, OR
NOT((RESPONSE("Q 2 Type of program Global","004c43af9cd240b6a0db049447ce9b72")="Global") OR
(RESPONSE("Q 2 Type of program Local","004c43af9cd240b6a0db049447ce9b72")="Local") AND
(RESPONSE("Q 2 Type of program both","004c43af9cd240b6a0db049447ce9b72")="Both"))
5. Example of a logic condition with AND, OR
(RESPONSE("Q 3 Focus of program: Education","e1b7f41b60994bba8e41efceae0c2149")="Education")OR
RESPONSE("Q 3 Focus of program: Profession","e1b7f41b60994bba8e41efceae0c2149")="Profession")OR
RESPONSE("Q 3 Focus of program: Transport","e1b7f41b60994bba8e41efceae0c2149")="Transport"))
AND
(RESPONSE("Q 8 Markets served City","5e22ee7f011d4fc28b96fa63e3ae2737")="City")OR
RESPONSE("Q 8 Markets served State","5e22ee7f011d4fc28b96fa63e3ae2737")="State"))
6. Example of a logic condition where you need to check the percentage or exact value of a particular datapoint. In the below example we are checking whether this datapoint has a value greater than 0
VALUE(RESPONSE("Q 22 Total funding contribution from partners in the last calendar year","26b5c8717fe7494b9aa13d83d10bb615")))>0
7. Hide particular section or questions to some users and would be visible to other users in survey. So in below case, the ABC will not find the section on which you set this condition
(DISPLAY_NAME() <>"ABC")
Template Modification Rules
There are few rules while you modify the templates, please keep a note of them
Common Rules
- If you want to carry forward any of the responses from previous surveys, make sure text of choices under checkbox/radio/dropdown is kept the same as in the previous survey.
Probench Version 3 & 4 Rules
- For checkbox/radio/dropdown make sure that immediate child questions are of type choice
Adding different types of questions in template
Adding Table
- Create a question with type Table .
- In Table question, first add question type Row . This row will be the heading of the table.
- In that first row add inline text that will show the text in the header of the table.
- Now in Table question add another question with type row. If you provide text to this question then it will become the first column of the row.
- In second row add questions which you want to add.
- Likewise add multiple rows and questions in those rows.
- This will create your table.
Adding Checkboxes
- Create a question with type checkboxes in template. If you provide text to this question then it will become heading of checkbox question.
- Add questions in checkboxes questions with type choice. Provide text to this question, that will appear next to checkbox in survey page.
- It will create a checkbox in survey.
- If want to create multiple options in checkboxes then add multiple choice questions in checkbox question.
- Exclusive is a question type used in checkbox, which makes all other options unticked while it is ticked in checkbox.
- This video will explain how to create checkboxes in template.
Adding Radiobuttons
- Create a question with type radio in template. If you provide text to this question then it will become heading of radiobutton question.
- Add questions in radio questions with type choice. Provide text to this question, that will appear next to radiobutton in survey page.
- It will create a radiobutton in survey.
- If want to create multiple options in radiobutton then add multiple choice questions in radio question.
- This video will explain how to create radiobuttons in template.
Adding File & URL
- Create a question with type as URL for url text. Provide text to this question in template, that will appear as heading for url question.
- Create a question with type as File for document attachment. Provide text to this question in template, that will appear as heading for Document Attachment question.
- This video will explain how to create file & url in template.
Adding Dropdown
- Create a question with type Dropdown in template. If you provide text to this question then it will become heading of dropdown question.
- Add questions in dropdown question with type choice. Provide text to this question, that will appear in dropdown in survey page.
- It will create a dropdown in survey.
- If want to create multiple options in dropdown then add multiple choice questions in dropdown question.
- This video will explain how to create dropdown in template.
Adding Key Notes
1- Go to "Manage Templates"
2- Search for your template in the Search Box.
3- Then click on the Blue Edit Button.
4- As you are looking to add Key Notes to the indicators under "Deforestation Call to Action (C2A) Module" Section, so open that section in the template.
5- Under the Section Open the Page "Introduction Call to Action"
6- There you see question C2A 1
7- So C2A 1 is the Page type question and inside that Page you will be able to see Group type question.
8- As we are adding Key Notes to that question we have to add Key Notes type question between "Page" and "Group"
9- So for that we have to place the cursor on Group level and there you will be able to see Txt "Add some text".
10- Click on it and then you get a message stating :-
- You can add the text immediately before this node, or as a child of it.
   Click 'OK' to add it immediately before this node.
   Click 'Cancel to add it as a sub-node.
11- As we want it above the Group level and Below the Page level we click on OK.
12- Once you Click on OK you will be able to see Inline dropdown type question added between Page and Group.
13- So click on that dropdown and select Key Notes which is under custom.
14- On the left hand side of Key Notes you will be able to see Txt, click on it so that the Text box opens up.
15- Add your information into that box and again click on Txt to close the box.
16- Now click on Save Changes.
Video link on how to add Key notes :- How to add Key Notes
Adding Popups
1- Go to Manage Templates
2- Search for your template in the Search Box.
3- Then click on the Blue Edit Button.
4- As you are looking to add Pop-up to the indicators under "Deforestation Call to Action (C2A) Module" Section, so open that section in the template.
5- Under the Section Open the Page "Introduction Call to Action"
6- There you see question C2A 1
7- So C2A 1 is the Page type, when you open that Page you will see Group type question and under that you will see a Radio level question.
8- As Pop-up is always added on question level, here in this case the question level is a Radio type so Open the Radio question and there we add the Pop-up type question and inside it we add the information.
9- So for that we have to place the cursor on Choice level and there you will be able to see Txt "Add some text".
10- Click on it and then you get a message stating :-
- You can add the text immediately before this node, or as a child of it.
   Click 'OK' to add it immediately before this node.
   Click 'Cancel to add it as a sub-node.
11- As we want it above the Choice level and Below the Radio(Question) level we click on OK.
12- Once you Click on OK you will be able to see Inline dropdown type question added between Radio and Choice.
13- So click on that dropdown and select Po-up which is under System.
14- On the left hand side of Pop-up you will be able to see Txt, click on it so that the Text box opens up.
15- Add your information into that box and again click on Txt to close the box.
16- Now click on Save Changes.
Video link on how to add Pop-up :- How to add Pop-up
Popup Text
- Create a question with type Popup Text or Popup Text(500) in template. If you provide text to this question then it will become heading of Popup question.
- If we select Popup Text question type then it will show normal text in the popup. If we select Popup Text(500) then it will allow to add upto 500 words.


Popup Number/Popup Percent
- Create a question with type Popup Number or Popup Percent in template. If you provide text to this question then it will become heading of Popup question.

- The Answer entered in the Popup will automatically refect in the textbox outside the popup.

- You can also add multiple controls as children of the popup.

- You can use this along with rules to create calculators inside of a popup.

Table All
Create a question with type Table All.

In Table question, first add question type Row . This row will be the heading of the table.
In that first row add inline text that will show as the column header of the table.
(Table All currently supports Checkbox , Dropdown and Custom Dropdown question type).
In Table All - Checkbox :- In this format, after adding a row header question, the next question type we use is "Checkbox." Within this Checkbox, we insert a Row and then add choices under that row. Structure for Table All - Checkbox
In Table All - Dropdown :- In this format, after adding a row header question, the next question type we use is "Row." Within this row, we add a "Dropdown" and then include choices under that dropdown. Structure for Table All - Dropdown
In Table All - Custom dropdown :- In this format, after adding a row header question, the next question type we use is "Row." Within this row, we add a "Custom dropdown". Structure for Table All - Custom Dropdown
In the "Table All" format, selecting or deselecting any option in the last column will automatically select or deselect all options in that specific row.
If you provide text to this question then it will become the first column of the row.
In second row add questions which you want to add.
Likewise, add multiple rows and questions in those rows.
All questions in the table should be mandatory, while the rows in the table will be voluntary. The checkbox choices should be mandatory.
This will create your Table All.

Table None
Create a question with type Table None.

In Table question, first add question type Row . This row will be the heading of the table.
In that first row add inline text that will show the text in the header of the table.
Now in Table None question add another question with type Checkbox or Dropdown or Custom Dropdown (Table None currently supports Checkbox , Dropdown and Custom Dropdown question type). If you provide text to this question then it will become the first column of the row.
In Table None - Checkbox :- In this format, after adding a row header question, the next question type we use is "Checkbox." Within this Checkbox, we insert a Row and then add choices under that row. Structure for Table None - Checkbox
In Table None - Dropdown :- In this format, after adding a row header question, the next question type we use is "Row." Within this row, we add a "Dropdown" and then include choices under that dropdown. Structure for Table None - Dropdown
In Table None - Custom dropdown :- In this format, after adding a row header question, the next question type we use is "Row." Within this row, we add a "Custom dropdown". Structure for Table None - Custom Dropdown
In second row add questions which you want to add.
Likewise, add multiple rows and questions in those rows.
The last row should have choice as an exclusive.
If None of the above is selected then the checkbox gets deselected and vice versa.
Each column choice should be selected or else we will get error message.
This will create your Table None.

Table All+None
Create a question with type Table All+None.

In Table question, first add question type Row . This row will be the heading of the table.
In that first row add inline text that will show the text in the header of the table.
Now in Table All question add another question with type Checkbox or Dropdown or Custom Dropdown (Table All+None currently supports Checkbox , Dropdown and Custom Dropdown question type). If you provide text to this question then it will become the first column of the row.
In Table All+None - Checkbox :- In this format, after adding a row header question, the next question type we use is "Checkbox." Within this Checkbox, we insert a Row and then add choices under that row. Structure for Table All+None - Checkbox
In Table All+None - Dropdown :- In this format, after adding a row header question, the next question type we use is "Row." Within this row, we add a "Dropdown" and then include choices under that dropdown. Structure for Table All+None - Dropdown
In Table All+None - Custom dropdown :- In this format, after adding a row header question, the next question type we use is "Row." Within this row, we add a "Custom dropdown". Structure for Table All+None - Custom Dropdown
In second row add questions which you want to add.
Likewise, add multiple rows and questions in those rows.
The last row should have choice as an exclusive.
If All assets are selected then exclusive will get deselected and vice versa.
This will create your Table All+None.

Table Exclusive
- Create a question with type Table (Exclusive).

- In Table question, first add question type Row . This row will be the heading of the table.
- In that first row add inline text that will show the text in the header of the table.
- Now in Table Exclusive question add another question with type Checkbox or Dropdown or Custom Dropdown (Table Exclusive currently supports Checkbox , Dropdown and Custom Dropdown question type). If you provide text to this question then it will become the first column of the row.
- In Table Exclusive - Checkbox :- In this format, after adding a row header question, the next question type we use is "Checkbox." Within this Checkbox, we insert a Row and then add choices under that row. [Structure for Table Exclusive - Checkbox]
- In Table Exclusive - Dropdown :- In this format, after adding a row header question, the next question type we use is "Row." Within this row, we add a "Dropdown" and then include choices under that dropdown. [Structure for Table Exclusive - Dropdown]
- In Table Exclusive - Custom dropdown :- In this format, after adding a row header question, the next question type we use is "Row." Within this row, we add a "Custom dropdown". [Structure for Table Exclusive - Custom Dropdown]
- In second row add questions which you want to add.
- Likewise add multiple rows and questions in those rows.
- Make sure all child of table exclusive are marked as voluntary in template.
- At least each column should have one tick or else it will give an error message.
- This will create your Table (Exclusive) question type.
How to copy a question from one template to another?
The same procedure applies to all browsers, but Assuming the points below the process works like this:
Assumption
- You’re using Internet Explorer.
- We’re taking an example of copying Q60 from the “2020 Global Index” to the “2021 Global Index”.
- The template id and node id are the example.
- The url of your probench is replace here by https://reportingframework.com/.
- Go to template 2020 Global Index in template editor.
- Hover over Q60 so that you can see the tittle menu for the question as shown in Template Toolbox.
- Go to Q60 in the 2020 Global Index and click on the green up arrow marked as 11 at Template Toolbox.
- Go to the address bar of your browser (what is address bar?) and copy the string. It will look like this.
https://reportingframework.com/Manager/Template/Editor.aspx?survey_template_id=512bf6db-3cf8-4f25-8c5f-c400d030877f&survey_node_id=href:ccbdd11e-88e0-4c26-a6b1-448006ed18a1
- So now you have the reference to this question copied to your computer’s memory.
- Go to the 2021 Global Index:
https://reportingframework.com/Manager/Template/Editor.aspx?survey_template_id=e707e3e2-10e0-4f78-a371-c8981bb570d8
- Hover over the question where you want to paste the question, so that you can see the menu.
- Click the green down arrow as 12 at Template Toolbox . (If the browser shows a warning message at this point get the browser to allow the script to run.)
- Click “OK” –> “OK” (don’t press Cancel - this doesn’t work currently) –> “OK”.
- Reload the page and you can see that Q60 is now in the survey.
Different tabs in template page
Standard
It is the standard view of the template page where manager can add, edit or delete questions and change structure of template. Manager can set question type and options like mandatory field, visible to user, don’t copy responses in this page of standard tab only.

To visit standard page of template click on Standard in top menu of template.
Optional/Mandatory : To make questions optional click on icon and make it green, and to make it mandatory click on icon and make it red or disable.
Visible : To make questions visible to users, make icon disable, and to make questions only visible to admin click on icon and make it locked with red circle.
Prefelling/Copy Responses :
To make question responses copied or prefilled in other templates with the same structure click on this icon and make it look like 3 flopy, and if you don’t want to prefill the responses then clcik on this icon and make it single flopy.
If you wish to retain prefilling while changing the structure of the indicator, always cut rather than copy that node. Prefilling works on question or node id which changes when you copy. Hence you will need to cut the node and paste it wherever required.
Scores
Scores for each questions are added in this tab.
Defaults
The 'Default' field becomes visible and can be used to prefill the response of a question with the value from another question in the current template, setting it as the default. This field contains the node_id of the source field from which the value is being defaulted.
Frontend Output:
In the above snapshots, the answer in 14.1 has been set as the default. Any value applied in 14.2 will be visible in 14.1, as it has been set as the default.
Variables

On this tab VARIABLE_NAME and DESCRIPTION Field is displayed.
- To visit variables page of template click on Variables in top menu of template.
- DESCRIPTION will hold the description of the field to understand the purpose of the field.
- VARIABLE_NAME is used as a unique name for this field for the reporting purpose.
Extended
In extended page the purpose of the question is set why question is used. Also sets the indicator that the question is mandatory or voluntary or both.
To visit the extended page of the template, click on Extended in the top menu of the template.
- Select an option from the dropdown to define why this question is used.
- Select an option from the dropdown to specify whether the question is Public, Private, or No Disclosure.
- Select an option from the dropdown to assign tags.
Dependents
A dependants field will get visible which will hold the node_id’s of the questions whose status is dependant on the highlighted question.
Developer
To visit the Developer page of the template, click on Developer in the top menu of the template.
- We can add the max score in this box. Setting the max score here ensures that the value does not exceed the total score."
- For table-type questions, we use the Script box, where the script is provided by the developers. We apply the node_id from the review phase and the specific question. This serves as an alternative for review-phase questions for table-type questions.
Rule

- Go to Rule tab as shown number 1 in the above image.
- Then create the Rule under Info tab and give your rule a name (showed as number 2 in the image).
- Place your rule name to the node id where you want to apply that rule (showed as number 3 in the image).
- Place your rule parameter (@1="node id",@2="node id") to the node id where you have placed your rule name (without leaving any extra space)(showed as number 2 in the image).
- Rule also works as logic. If same logic applies many times in the survey then you can make that logic as rule and use wherever it is required.
FAQ's
When to use Save Changes option?

After any changes structural changes have been made to the template like moving questions, adding questions, deleting questions Save Changes button will be visible. If any changes has made in text or type of questions then save changes won’t be visible. You must click save changes to save the structural changes. This is important because the changes will not be displayed and saved for users in survey.
What are the implications of change in questions for current year cycle?
To first give a context, Each year there are survey cycles. Since we learn from the survey, there is need to change in few questions (indicators) from past year survey. So in order to achieve the above request, we suggest that you create a copy the template. The common question is what will be the implication? Will I loss last year responses or data?
Firstly, if you create the copy of last year’s template none of the responses from the last year will not be lost. However there can be other implications namely, the prefill feature will not work accurately.
Jump to node(question) by Id and variable name
Search by ID
- This functionality available on the page of Template on create or update option. Navigate to Prepare > Templates click on edit or new template.
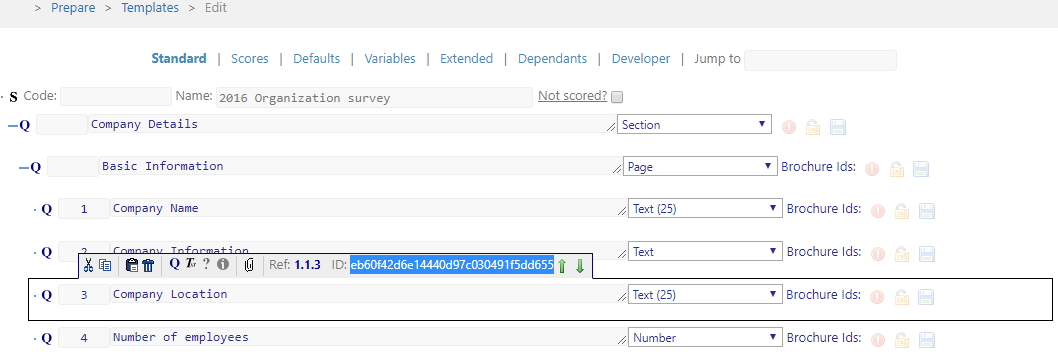
- If you know the ID name then type diectly on Jump To box OR You can find the ID on mouse over to any particular question as shown in below image. Copy that Id and paste in Jump To search box and press “ENTER”.
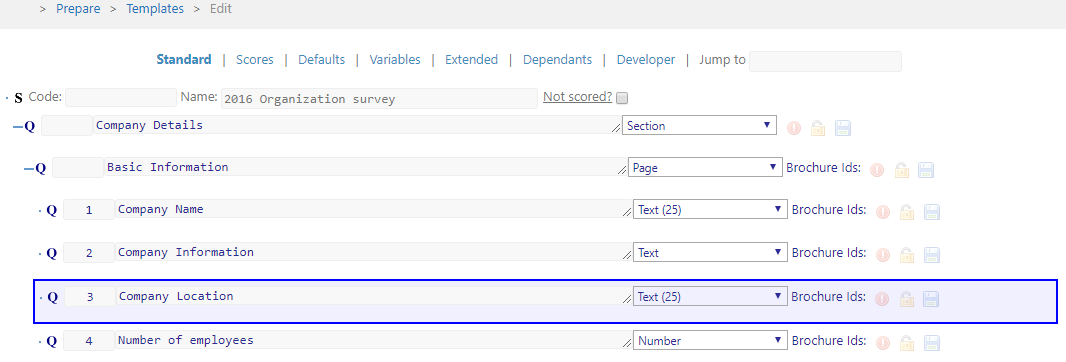
- You will see the matching node becomes highlited as shown in below image.


Search by Variable Name
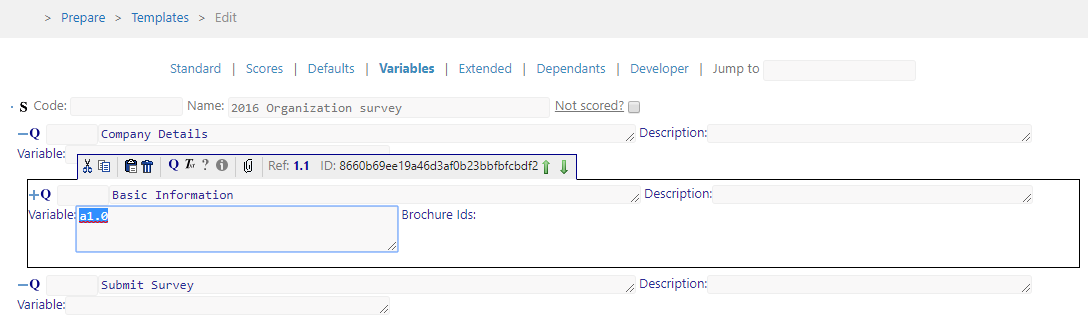
- If you know the Variable name then type diectly on Jump To box OR you can find the variable name by click on variable tab option in headrs, it shows bolw of each question question as shown in below image. Copy that Variable name and paste in Jump to box and press “ENTER”.
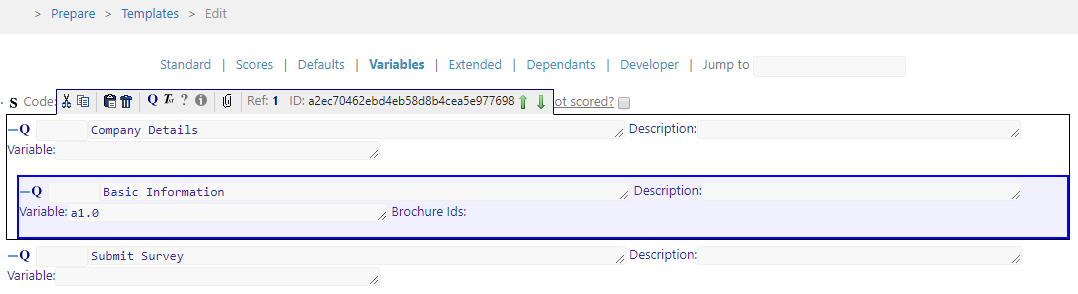
- You will see the matching node becomes highlited as shown in below image.


How to create a multiselect question
How to create a singleselect question
Additional FAQ's
Was this article helpful?